 By Tarang Bansal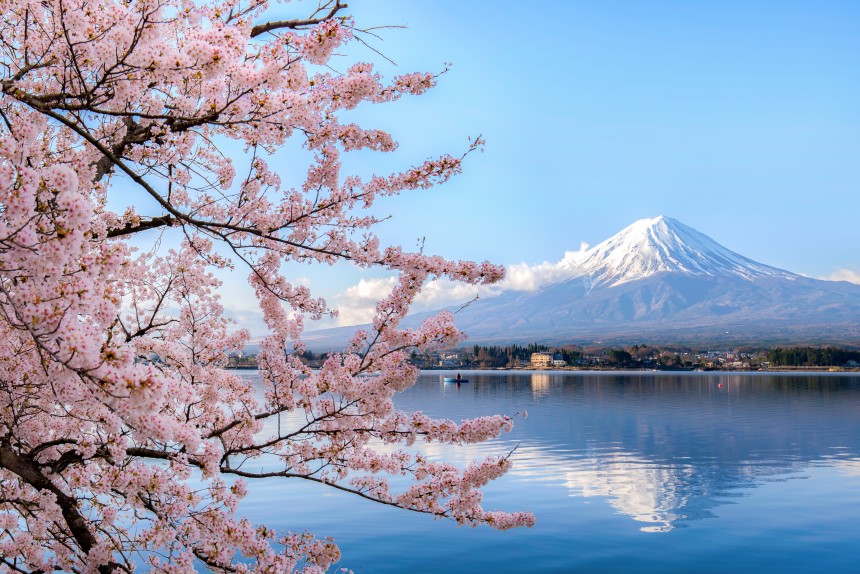
Mt Fuji guide for Indians- Planning to visit Mt Fuji from Tokyo as an Indian traveller? This Mt Fuji guide for Indians covers everything you need, from visibility tips, cycling routes, viewpoints, and the full 2026 climbing guide. Most Indian travellers who visit the Fuji area return with one of two stories. The first: “We went for a day, took the bus from Shinjuku, stood at Kawaguchiko, and… Mt Fuji was completely covered in clouds. We couldn’t see anything.” The second: “We stayed overnight, woke up at 5 AM, and it was just sitting there in the morning light – enormous and perfect.”
The difference between these two stories isn’t luck. It’s planning.
This Mt Fuji guide for Indians covers everything from day trips to climbing, whether you have one day or three, whether you want to look at the mountain or climb it, whether you’re a casual day-tripper or a dedicated hiker. It also covers the Fuji Five Lakes by bicycle, the best viewpoints, and the brutally honest reality of Mt Fuji visibility.
Mt Fuji is on the UNESCO Heritage List. UNESCO named it a cultural site instead of a natural one because of its deep spiritual and artistic impact. It is a holy place for prayer. People have made holy walks there for hundreds of years. It gave great ideas to painters and writers. The UNESCO area is not just the peak. It also covers- old shrines, hilly paths, clear lakes near the base, water springs. If you are interested in what else UNESCO has classified on its list for Japan, here is a full guide.
If you want the full Japan trip context, read my main 10-day Japan blog here.
The Mt Fuji Visibility Problem: The Thing Nobody Warns You About
Before anything else: Mt Fuji is not always visible. Not even from its own base.
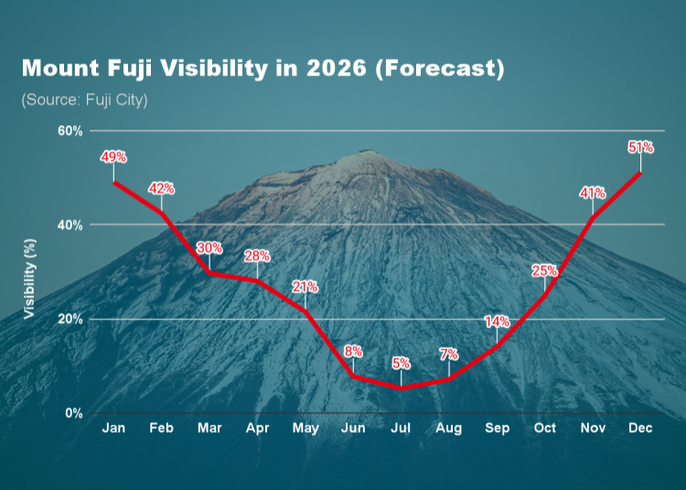
The mountain generates its own weather. Warm air rises from the lowlands, hits the cold volcanic cone, and condenses into clouds- often by mid-morning, often covering the summit entirely. This is most acute in summer (June-August), when cloud cover is thickest and most persistent.
When Mt Fuji is visible:
- December to February – winter air is dry and cold; Fuji has the clearest views of the year, often visible for full days; snow-capped peak is the definitive Japanese image
- Early morning (before 9 AM) – before thermal clouds build; best window is 6-9 AM
- After rainfall – the air scrubbing effect of rain clears visibility for a brief window
- Autumn (October-November) – second-best season for visibility; foliage + clear Fuji = spectacular
When Mt Fuji is often NOT visible:
- Summer afternoons (most of the day, frankly)
- After midday in any season
- June (rainy season)
- Typhoon season (August-September)
Before you travel: check these live Fuji cameras
Two reliable live webcam services:
- Fujisan Weather Camera (official): fujisan-wm.jp/livecam/ – updates every few minutes
- Weathernews Fuji Camera: weathernews.jp/s/fuji/ – real-time camera feeds from multiple angles
- Mt Fuji Visibility Forecast App – search “Fuji view forecast” on iOS/Android; several good Japanese apps give next-day and 7-day visibility forecasts
The golden advice: don’t leave Tokyo until you’ve checked the Fuji-cam that morning. If the summit is clear at 7 AM, book your bus and go immediately. If it’s clouded, wait for a better day.
How to Reach Kawaguchiko from Tokyo
Kawaguchiko (Lake Kawaguchi) is the main gateway to the Fuji Five Lakes area, roughly 100 km southwest of central Tokyo.
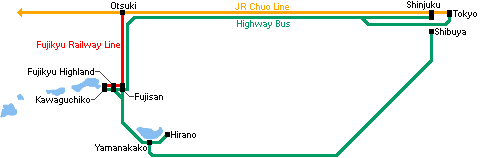
Option 1: Highway Bus (Recommended for most travellers)
- From: Shinjuku Station South Exit Bus Terminal (Busta Shinjuku)
- To: Kawaguchiko Station
- Journey: ~1 hour 45 minutes (2.5-3 hours on peak weekends due to highway congestion)
- Cost: ¥2,000-2,200 one-way (~₹1,200-1,300); ¥3,500-3,700 return
- Booking: You can reserve in advance online
- Frequency: ~1-2 buses per hour; earlier morning buses (7-9 AM) avoid traffic
Shinjuku–Kawaguchiko bus tickets (& return) or Japan Rail tickets– Both take about 2 hours one-way
Option 2: Train (More reliable timing)
- From: Shinjuku Station
- Route A (Local, cheapest): JR Chuo Line to Otsuki (~55-80 min) → transfer to Fujikyu Railway to Kawaguchiko (~55-60 min)
- Total: ~2h30m, ¥2,500-3,000 one-way
- Route B (Direct Limited Express “Fuji Excursion”): Shinjuku to Kawaguchiko without transfer
- Total: ~2 hours, ~¥4,000+ (seat reservation required; only 4-5 departures daily)
- Pro tip: The Fuji Excursion has Mt Fuji views from the carriage windows once you pass Otsuki
Option 3: Direct Bus from Tokyo 5th Station (for climbers)
- Season-specific: July 1-September 10 only
- From: Shinjuku Highway Bus Terminal
- To: Fuji Subaru Line 5th Station (Yoshida Trail starting point)
- Journey: ~2h15m, ¥2,700 one-way
- Best option if you’re going straight to climb, not to the lakes
Day Trip vs Overnight Stay: Honest Advice
Day Trip vs Overnight: What This Mt Fuji Guide for Indians Recommends
Day trip: worth it ONLY if:
- The Fuji-cam shows clear skies before you leave
- You leave Tokyo by 7-8 AM (earliest buses)
- You stick to Kawaguchiko and don’t try to see all five lakes
- You’re returning to Tokyo with a clear “back on the 5 PM bus” plan
Day trip itinerary:
- 7:00 AM: Leave Shinjuku by bus
- 9:00 AM: Arrive Kawaguchiko
- 9:15 AM: Rent a bike (e-bike, ¥3,000/day) from shops near the station
- 9:30-11:30 AM: Cycle the north shore of Lake Kawaguchi, hit Oishi Park, catch the reverse Fuji reflection if sky is clear
- 11:30 AM: Mt Tenjo Ropeway (¥1,000 return), views from above
- 12:30 PM: Lunch at a lakeside café; Hōtō noodles (local pumpkin miso noodle dish – vegetarian-friendly)
- 2:00 PM: Chureito Pagoda viewpoint (15 min by local bus + 398 stairs) for the iconic pagoda-and-Fuji shot
- 4:30 PM: Return to Kawaguchiko Station
- 5:00 PM: Bus back to Shinjuku, arrives ~7 PM
A day trip still leaves a lot on the table. No sunrise, no evening reflections, no other lakes, no onsen, no true early-morning mountain light. The overnight-or-longer option is categorically better for anyone willing to invest the extra time. This Mt Fuji guide for Indians recommends an overnight stay for anyone who can manage it.
Overnight stay: highly recommended if you can fit it.
- One night minimum: Allows a morning wake-up at 5 AM for the best Fuji light, full cycling day, and evening lakeside dinner
- Two nights ideal: Covers all five lakes, Oshino Hakkai, Chureito Pagoda, cycling, and relaxed onsen time
- Hotels and ryokan: ¥10,000-25,000 per night mid-range; some ryokan have rooms with Fuji-facing windows at a premium but worth it
Nothing can be as relaxing as resting in an Onsen on a cold day. Here is an Onsen Guide.
Cycling the Fuji Five Lakes: The Best Way to Experience the Region
Cycling is, by unanimous verdict of experienced Fuji-area travellers, the single best way to experience the lakes. Better than buses (more flexible), better than driving (more immersive), better than walking (more ground covered).
Renting a Bike at Kawaguchiko
- Shops: Multiple rental shops directly outside Kawaguchiko Station (Fujikyu Retro Bus rental area, Hello Cycling, local shops)
- Standard bike: ¥1,500-2,000/day
- Electric-assist bike (e-bike): ¥3,000/day (strongly recommended – the north shore has inclines that will tire non-cyclists on standard bikes)
- Includes helmet: Usually yes; confirm when renting
- Operating hours: Shops open ~8:30 AM-5 PM
Take the e-bike. Trust the research. Standard bikes are manageable for the flat lakeside sections but become tiring once you explore beyond the main Kawaguchiko loop.
If you love cycling in new places, like I do, the Shimanami Kaido is a world-class 70km long cycling route with bridges connecting islands. Here is my dream guide of it.
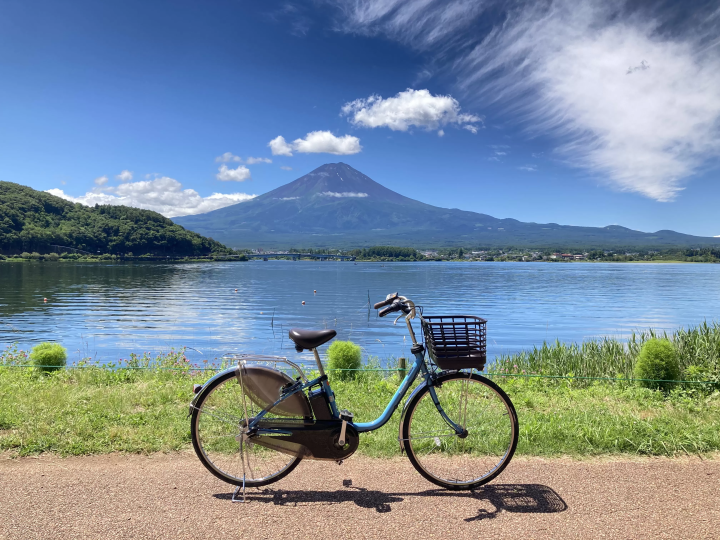
Route 1: Lake Kawaguchiko Circuit (Easy- 1 Day)
- Distance: ~20 km around the lake
- Riding time: 1.5-2 hours; 3-4 hours with stops
- Terrain: Mostly flat; gentle inclines on the north shore
Key stops on the Kawaguchiko circuit:
- Nagasaki Park (North Shore) – best “Sakasa Fuji” (Reverse Fuji) reflection spot; arrive before 9 AM for the mirror surface
- Oishi Park – wide lawn with unobstructed Mt Fuji view; lavender in June-July
- Ubuyagasaki peninsula – “postcard Fuji” view across the water; one of the most photographed angles
- Kawaguchi Asama Shrine – ancient cedar-canopied shrine with a hidden mountain torii viewpoint above it (short hike)
- Mt Tenjo Panoramic Ropeway – ¥1,000 round trip; summit observation deck gives aerial view of the lake and mountain; also the start of Mt Mitsutoge hike for more adventurous visitors
Route 2: Extended Multi-Lake Circuit (2 Days- 60 km)
The full five-lake circuit covers approximately 60 km connecting all five lakes through forested roads, farmland, and lava-field terrain.
Day 1 (Kawaguchiko → Saiko → Shojiko):
- Lake Saiko – second most accessible after Kawaguchiko; Iyashi-no-Sato traditional thatched-roof village restored after a typhoon; Saiko Bat Cave (largest lava cave accessible to tourists, ~¥ 300); quieter than Kawaguchiko with good Fuji views from the west end
- Lake Shojiko – smallest lake; arguably the most photogenic Fuji view, especially from the north bank where Fuji fills the horizon; very few tourists; serene
Day 2 (Motosuko → Yamanakako → back to Kawaguchiko):
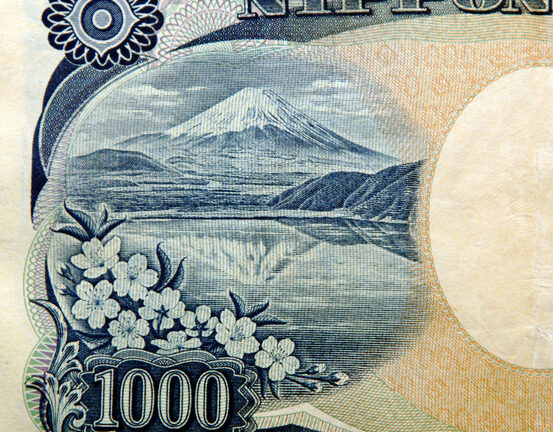
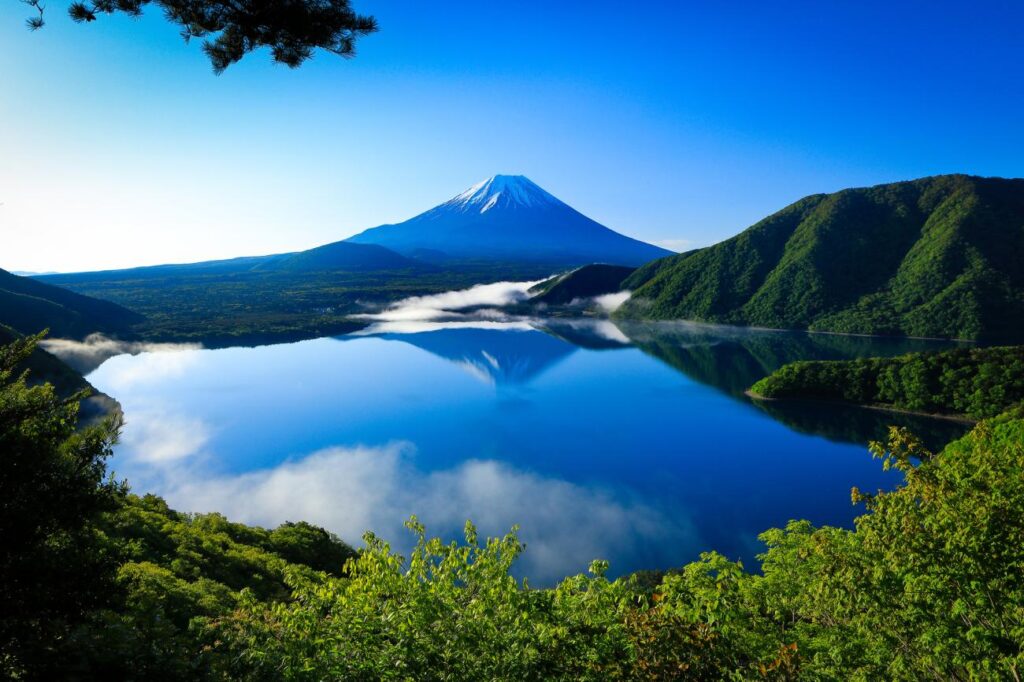
- Lake Motosuko (Motosu) – western end; famously depicted on Japan’s ¥1,000 banknote (the view from the northwest bank); pristine water; Fuji Shibazakura Festival April-May (moss phlox flower fields + Fuji = stunning)
- Lake Yamanakako – easternmost and largest lake; 14 km perimeter cycle path; good Fuji views from the western shore; hot springs on the west side
The full 60-km circuit is doable in 2 days on e-bikes with overnight at a lakeside guesthouse near Saiko or Shojiko. It passes through Aokigahara Forest (the famous “sea of trees” – keep to the road on the cycling route) and offers a Fuji that feels increasingly solitary as you move away from the Kawaguchiko tourist hub.
The Aokigahara Forest is one of the most silent places on earth. The porous, hardened volcanic lava beneath the trees absorbs sound waves, while the dense tree canopy and lack of common wildlife dampen ambient noise. Hiking alone in the forest can feel eerie and hence guided tours are here. Here is an option for you.
Best Mt Fuji Viewpoints (and How to Access Them)
Beyond the lakeshores, these are the best dedicated viewpoints:
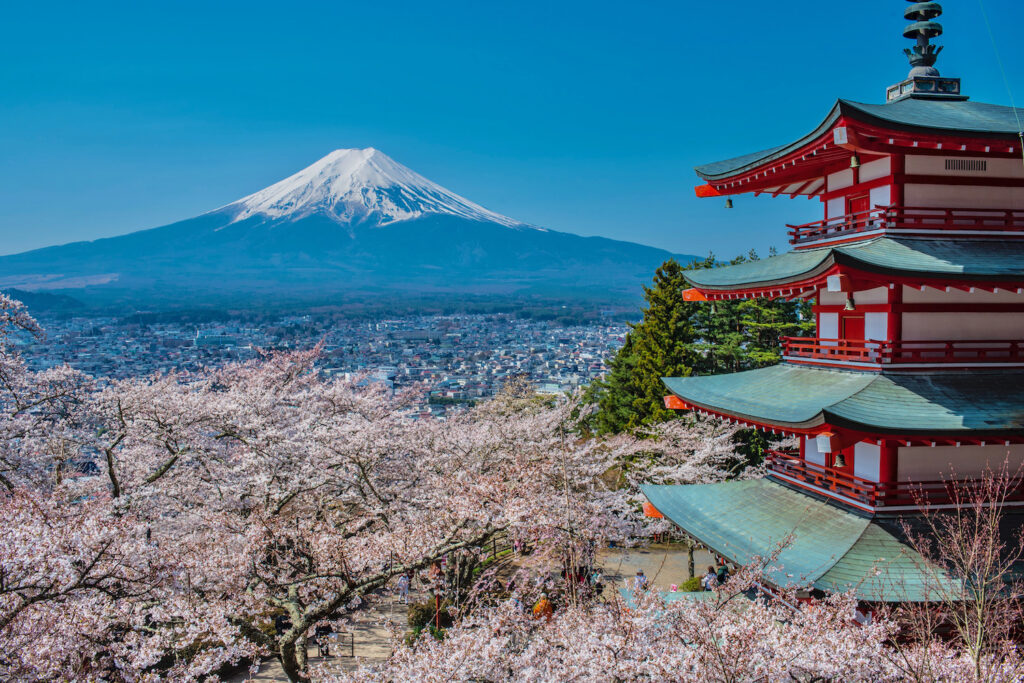
1. Chureito Pagoda- Arakurayama Sengen Park, Fujiyoshida
The most iconic Mt Fuji photo in Japan – a five-story red pagoda with Fuji behind it. Taken by practically every photographer who visits Japan. The view requires climbing 398 stairs from the Shimoyoshida Station entrance.
- Access: Fujikyu Railway to Shimoyoshida Station (5 min from Kawaguchiko), then 10-minute walk + 398 stairs
- Entry: Free
- Best time: Early morning (6-8 AM); in spring, cherry blossoms line the stairway creating the definitive cherry blossom + Fuji + pagoda shot
[Book your Fuji and sites around tour here]
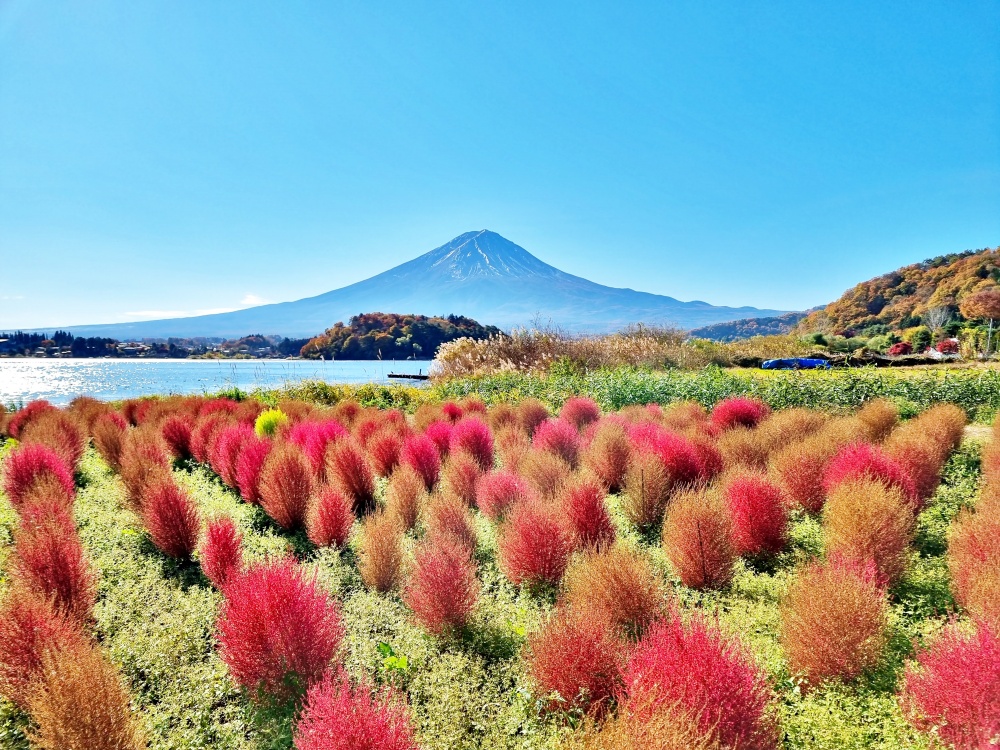
2. Oishi Park- North Shore Kawaguchiko
The most accessible clear-sky Fuji viewpoint. Flat, lakeside, no stairs, good parking and café. The place is famous for its flower beds which are seasonal. They keep changing them and every visit might be a surprise.
- Access: Red Bus Line from Kawaguchiko Station, ~15 min
- Entry: Free
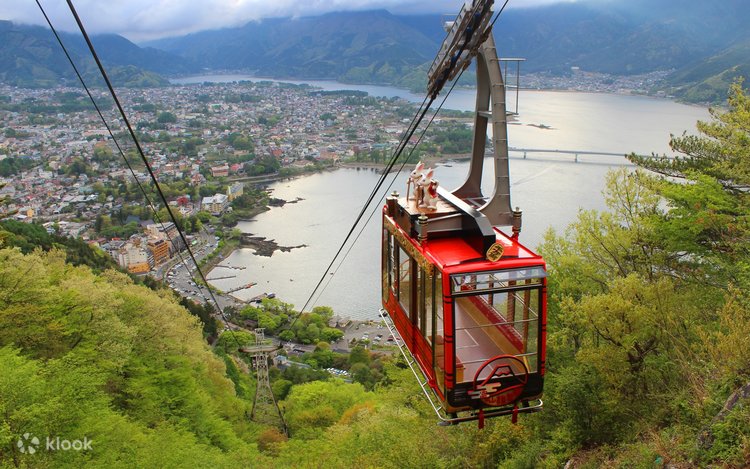
3. Mt Tenjo Observation Deck (Kachi Kachi Ropeway)
Aerial perspective on Kawaguchiko and Fuji behind it. 3-minute ropeway ride.
- Access: 15-minute walk from Kawaguchiko Station; ropeway ¥1,000 return
- Best time: Morning; combine with Mt Mitsutoge hike for extended mountain walking
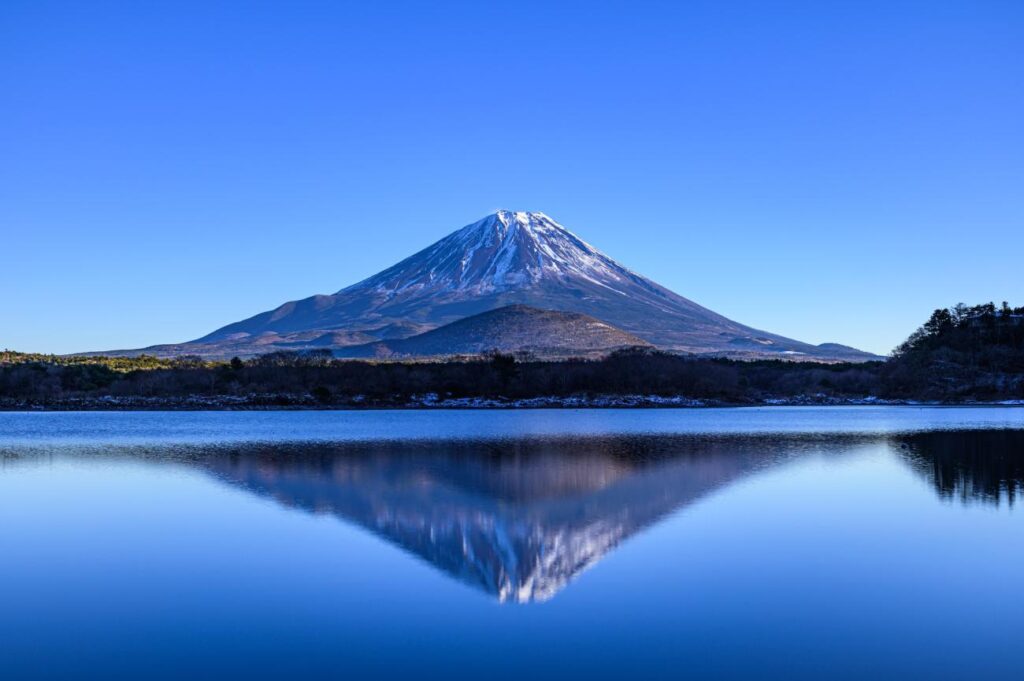
4. Lake Shojiko North Bank
Arguably the best unobstructed lake-and-Fuji composition, with Fuji filling the northern horizon and the small lake in the foreground. Remote but worth the journey.
- Access: From Kawaguchiko by bus (Green Omni Line, ~30 min) or bicycle
- Entry: Free
[If exploring the lakes is your thing, you will love this tour]
5. Lake Motosuko Northwest Bank (¥1,000 Banknote View)
The exact angle that appears on Japan’s ¥1,000 note. Recognised worldwide, rarely crowded because of the distance from Kawaguchiko. The picture is taken near the Koan Cabin/ Kouan Campsite area.
- Access: From Kawaguchiko by bus (~50 min) or bicycle circuit Day 2
- Entry: Free
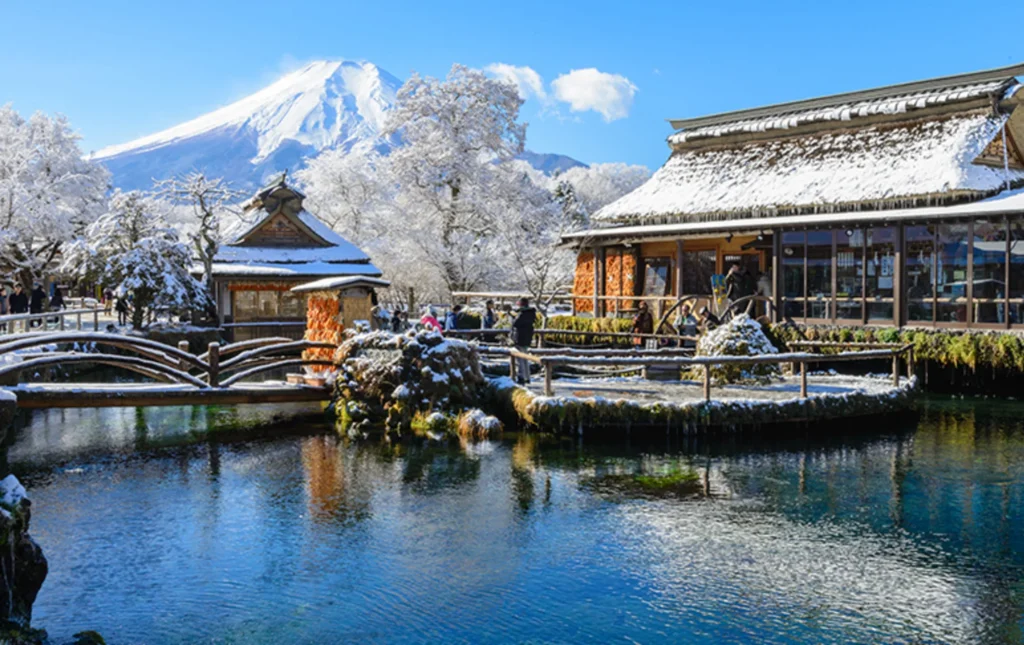
6. Oshino Hakkai
Eight sacred ponds fed by Mt Fuji’s snowmelt water, surrounded by traditional thatched farmhouses. The mountain rises behind the village.
- Access: Bus from Kawaguchiko (~15 min) or bicycle
- Entry: ¥500 for the main village pond area
- One of the most photographically “Japanese” spots in the Fuji region
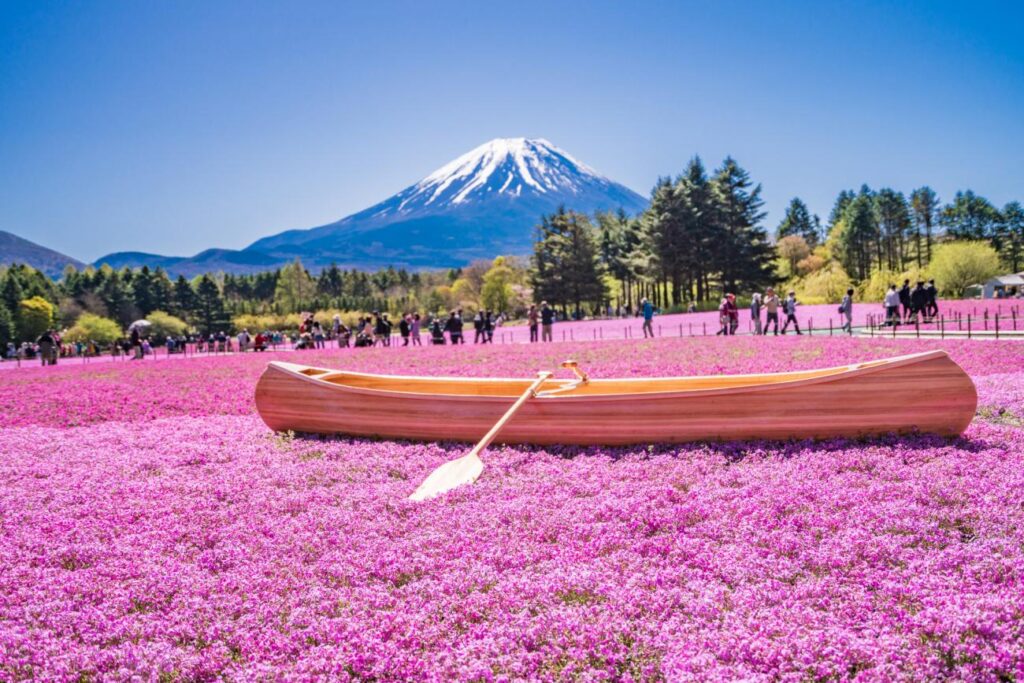
7. Fuji Shibazakura Festival (Lake Motosuko) – April-May Only
Pink moss phlox carpet + Mt Fuji = one of Japan’s most spectacular spring seasonal events. Only available April-May.
- Entry: ¥1,000 during festival season
If you want the best of pictures for your memories, Instagram or work, here is a tour that takes you to the 6 most Instagrammable spots around Mt Fuji
Hiking Mt Fuji: The 2026 Complete Guide
Should You Climb Mt Fuji?
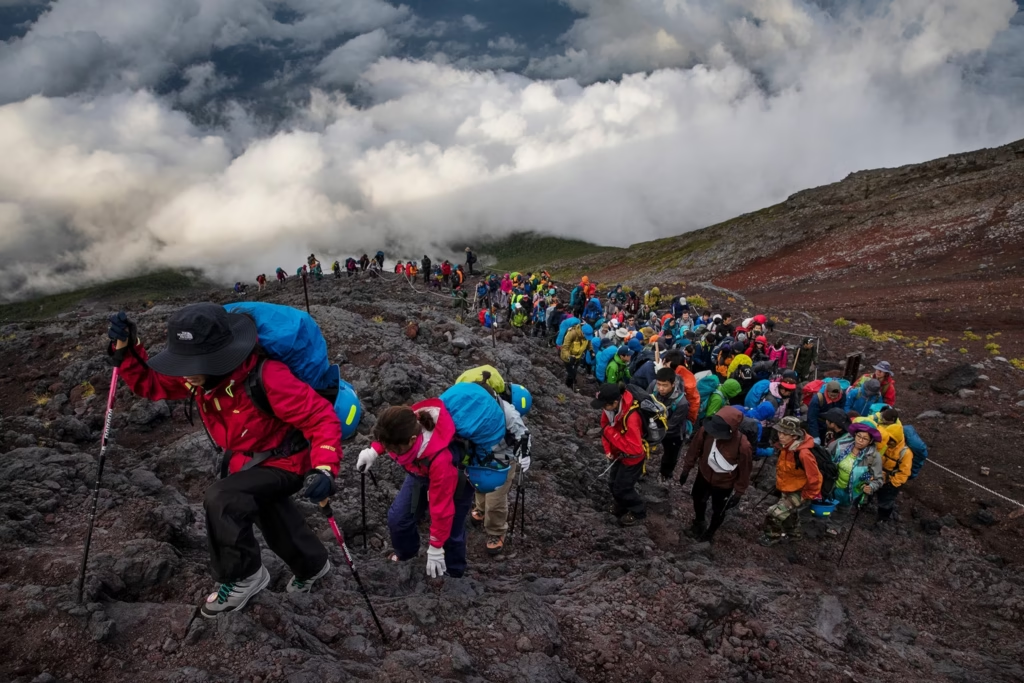
Honest answer: only if you’re specifically a hiker who wants the experience of standing on Japan’s highest point. The views from the lakeshores and viewpoints around Kawaguchiko are, frankly, better than what you see from the summit (which is often inside cloud cover). People climb Mt Fuji for the achievement and the goraikō (sunrise) – not because the summit is necessarily the most visually compelling place.
The famous Japanese proverb captures it perfectly: “A wise person climbs Mt Fuji once. Only a fool climbs it twice.” It’s hard, the weather is unpredictable, and the summit view – on the 30-40% of mornings that aren’t clouded – is genuinely spectacular. The other 60-70% of the time, you’re inside clouds.
That said, for physically fit, well-prepared travellers who want to stand at Japan’s highest point: go.
Season and Timing
Official climbing season:
- Yoshida Trail (most popular) + Subashiri Trail: July 1 – September 10, 2026
- Fujinomiya + Gotemba Trails: July 10 – September 10, 2026
- Outside these dates: Trails are officially closed; winter climbing is possible but requires technical mountaineering experience, specialist gear, and is extremely dangerous
Best timing within season:
- Early July (first two weeks): Less crowded, but weather more unstable
- Late July to mid-August: Peak season; most crowded; hot and humid on lower slopes; clearer summit windows than late summer
- September: Trails become less crowded; good conditions on earlier dates; mountain closes September 10
Avoid: The peak Japanese school holiday period (late July-August), when crowds on the Yoshida Trail reach maximum density.
If Outdoors are your thing, check out the other Outdoor Experiences in Japan.
The 2026 Regulations: What Has Changed
Japan introduced strict new climbing rules in 2024, tightened further in 2025-2026. You cannot just show up and start climbing. The key rules:
1. Mandatory ¥4,000 fee per person
- Doubled from ¥2,000 in 2024
- Applies to all four trails since May 2025
- Cash only at the gate. No credit cards, no IC cards. Bring exact change.
- Fee pays for trail maintenance, restrooms, and emergency rescue costs
2. Pre-registration required
- Book at fujisan-climb.jp – the official government website
- Registration opens approximately April-May for the July-September season
- Pre-pay online to skip the gate queue; walk-up registrations still possible but lines form in peak season
3. Gate closes at 2 PM on the Yoshida Trail
- The trailhead gate at the 5th Station physically closes at 2 PM
- If you haven’t passed through by 2 PM and don’t have a confirmed mountain hut reservation, you cannot enter
- The gate reopens at 3 AM for those with hut reservations
- This effectively bans “bullet climbing” – the dangerous practice of climbing through the night without sleep
4. Daily limit: 4,000 climbers on the Yoshida Trail
- If the cap is reached, the gate closes regardless of time
- In 2024, the cap was rarely exceeded, but it can be hit on peak weekends
- The other three trails (Fujinomiya, Subashiri, Gotemba) have no daily limit
5. Pre-learning video required (recommended)
- Climbers are asked to watch a 7-minute pre-learning video at fujisan-climb.jp covering safety, etiquette, and regulations
- Available in English, Chinese, Korean, Vietnamese, Thai
The Four Trails Compared
| Trail | Starting Altitude | Ascent Time | Descent Time | Daily Limit | Best For |
|---|---|---|---|---|---|
| Yoshida | 2,305m | 6-7h | 3-4h | 4,000 | First-timers |
| Subashiri | 1,970m | 5-8h | 3-5h | None | Quieter option |
| Fujinomiya | 2,400m | 5-6h | 4-5h | None | Efficiency |
| Gotemba | 1,440m | 7-10h | 3-6h | None | Experienced hikers |
Recommendation for Indian travellers: Yoshida Trail. It’s the most beginner-friendly, has the most mountain huts (17+), has separate ascent and descent paths to prevent collision, and has the most first-aid stations. Bus access from Tokyo is also direct.
The Two-Day, One-Night Itinerary (Gold Standard)
Never do Mt Fuji as a same-day round trip. The new rules effectively ban this (gate closes at 2 PM meaning insufficient time for a full summit and descent by bus back to Tokyo). More importantly, a single-day push is physically dangerous – altitude sickness risks increase when you climb without rest or acclimatisation.
The correct approach:
Day 1:
- Morning: Take the direct Shinjuku–5th Station bus (~2h15m, ¥2,700)
- Arrive 5th Station (~2,305m): acclimatise 1-2 hours; don’t rush up
- Afternoon: Begin climb; aim to reach 7th or 8th Station by late afternoon (3-5 PM)
- Evening: Check into your pre-booked mountain hut (~¥8,000-12,000/person; includes dinner)
- Sleep: 8 PM-12 AM (most huts start wake-up for summit push at midnight-2 AM)
Day 2:
- 1-3 AM: Wake up and begin summit push
- 4-5 AM: Reach summit for goraikō (sunrise)
- 5:30-9 AM: Descend on the dedicated descent trail
- Arrive 5th Station by 10-11 AM
- Take bus back to Kawaguchiko or Shinjuku by noon
Mountain hut booking: Opens as early as April for the July season. Popular huts (Goraikokan, Horeikan, Hakuunso) fill within days of opening. Set a calendar reminder for April and book immediately.
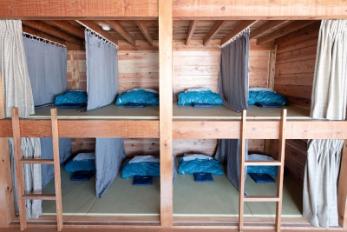
Here is group-guided 2-day expedition to Mt Fuji with hut stay.
What to Pack for Climbing Mt Fuji
Absolute essentials:
- Base layer (moisture-wicking, not cotton)
- Mid-layer fleece
- Waterproof rain jacket and trousers (summit temperatures can be 0-5°C even in August)
- Gloves and beanie
- Trekking poles (saves knees significantly on descent; available for rent at 5th Station ~¥600/day)
- Head torch / headlamp + spare batteries
- Water (2 litres minimum; refill at huts ~¥200 per bottle)
- High-calorie snacks
- ¥4,000 cash in coins/small notes for the gate fee
Useful but not required:
- Gaiters (the Yoshida descent trail has deep volcanic gravel)
- Buff/neck gaiter
- Altitude sickness medication (see below)
Do NOT wear: Jeans, cotton, fashion trainers, sandals, or flip-flops. Every year, ill-equipped climbers are rescued. Rangers at the gate may turn away visibly under-equipped climbers.
Altitude Sickness: The Serious Risk
Mt Fuji’s summit is 3,776m. Altitude sickness is a real, common, and potentially dangerous risk.
- Approximately 20-30% of climbers experience symptoms above 3,000m
- Symptoms: Headache, nausea, fatigue, dizziness, loss of appetite
- Risk factors: Fast ascent rate, poor hydration, prior alcohol consumption, individual physiology (not predictable from fitness level – fit people get altitude sickness too)
How to reduce risk:
- Climb slowly (“yukkuri, yukkuri” – slowly, slowly): The single most effective prevention
- Hydrate aggressively: 250ml of water every 30 minutes
- Rest at the 7th station before pushing higher; the overnight hut stay is the best prevention
- Avoid alcohol the day before and during the climb
- Consider Diamox (acetazolamide): A prescription altitude medication; consult your doctor before travelling. Available in India.
If you get serious symptoms (confusion, inability to walk straight, vomiting repeatedly): Descend immediately. Do not push on. The mountain will be there again.
Costs Summary for a Fuji Climb
| Item | Cost |
|---|---|
| Bus: Shinjuku → 5th Station (one-way) | ¥2,700 (~₹1,600) |
| Trail entry fee | ¥4,000 (~₹2,400) |
| Mountain hut (dinner + bed + breakfast) | ¥8,000-12,000 (~₹4,800-7,200) |
| Trekking pole rental (optional) | ¥600 (~₹360) |
| Food and water on mountain | ¥2,000-3,000 (~₹1,200-1,800) |
| Bus: 5th Station → Tokyo (return) | ¥2,700 (~₹1,600) |
| Total per person | ¥20,000-25,000 (~₹12,000-15,000) |
Plus gear procurement if you don’t have suitable clothing (Uniqlo and sports shops in Tokyo sell basic hiking gear; budget ¥5,000-10,000 for a full clothing kit if buying new).
Vegetarian Food Around Kawaguchiko
Vegetarian Food- What This Mt Fuji Guide for Indians Recommends Around Kawaguchiko:
- Hōtō noodles – Yamanashi’s signature regional dish: thick flat wheat noodles in miso broth with pumpkin, mushrooms, and vegetables. Vegetarian when ordered without pork & dashi. Available throughout Kawaguchiko. Cost ~¥1,000-1,500.
- Yoshidaudon – local thick udon noodles; vegetable version available at most shops
- Konbini at Kawaguchiko Station area – standard vegetarian options (see [vegetarian Japan guide])
- Oshino Hakkai food stalls – fresh tofu, vegetable senbei, local sweet snacks
- Mt Fuji 7-Eleven – the famously photographed 7-Eleven with Fuji in the background (note: just a regular 7-Eleven; the Fuji-behind-it is the attraction)
- Mountain huts (for climbers): Most serve pre-set meals with curry rice or similar. Vegetarian requests should be noted at booking time – some huts can accommodate.
When to Go: Fuji Area by Season
| Season | Visibility | Crowds | Activities | Verdict |
|---|---|---|---|---|
| Winter (Dec-Feb) | Best – snow-capped, clear skies | Lowest | Lake reflection, onsen, photography | Best for viewing |
| Spring (April-May) | Good – some cloud | High (sakura) | Cherry blossoms + Fuji, cycling | Best for photography |
| Summer (July-Sept) | Poor – constant clouds | Peak | Climbing only | Only for climbers |
| Autumn (Oct-Nov) | Good | High (foliage) | Cycling, foliage + Fuji, onsen | Best for cycling |
For pure Fuji viewing without climbing: November-February wins. For cherry blossom + Fuji: mid-April. For autumn foliage + cycling: late October-early November.
Frequently Asked Questions
Q: Is a day trip to Kawaguchiko from Tokyo worth it? Yes, if you check the Fuji-cam before leaving and the mountain is clear. Leave Shinjuku before 8 AM for the best morning visibility. Don’t attempt all five lakes in a day.
Q: Can I see Mt Fuji clearly from Kawaguchiko? Not guaranteed. Mt Fuji is frequently hidden behind clouds, especially in summer afternoons. Best visibility is winter mornings and early autumn. Check fujisan-wm.jp/livecam/ the morning you plan to go.
Q: Is cycling around the Fuji Five Lakes hard? Lake Kawaguchiko’s 20km loop is manageable in 3-4 hours on an e-bike (strongly recommended over standard bikes). The full 5-lake circuit is ~60km and needs 2 days.
Q: How much does it cost to climb Mt Fuji in 2026? ¥4,000 mandatory trail fee + ¥8,000-12,000 mountain hut (for the recommended overnight). Total climb costs roughly ¥20,000-25,000 (~₹12,000-15,000) per person including transport.
Q: Do I need to pre-book to climb Mt Fuji? Yes – pre-register and pay at fujisan-climb.jp. The gate closes at 2 PM on the Yoshida Trail; without a mountain hut reservation, you cannot pass through after 2 PM. Hut bookings open April/May and fill fast for peak dates.
Q: When is the climbing season for Mt Fuji? Yoshida + Subashiri trails: July 1 to September 10, 2026. Fujinomiya + Gotemba trails: July 10 to September 10. Outside these dates, the mountain is closed for non-expert climbers.
Q: What’s the risk of altitude sickness on Mt Fuji? Approximately 20-30% of climbers experience symptoms above 3,000m. Climb slowly, hydrate aggressively, rest at mountain huts, and descend immediately if symptoms become severe.
Q: Is the Chureito Pagoda viewpoint free? Yes, free to visit. Take the Fujikyu Railway to Shimoyoshida Station then walk up 398 stairs to the pagoda with Mt Fuji behind it. Best visited early morning.
Q: Where should I stay near Mt Fuji? Kawaguchiko town for the most options and best transport links. For the best chance of waking up to a clear Fuji view, book a lakeside ryokan with a Fuji-facing room on the north shore of the lake.
Q: Can I see Mt Fuji from Tokyo? Yes, on clear winter mornings Mt Fuji is visible from certain high points in Tokyo: Skytree observation deck, Tokyo Tower, and Shinjuku skyscrapers on the upper floors. Best months are December to February before 9 AM.
Final Word
Mt Fuji is Japan’s most famous image and one of the most recognisable mountain profiles in the world. Close up, it’s even more extraordinary than in photographs, a perfect volcanic cone rising in complete isolation, at a scale that doesn’t photograph well but overwhelms in person.
The key to doing it justice is understanding that Fuji rewards early mornings, multiple days, and patience. A day trip where you arrive at 11 AM and leave at 4 PM with the mountain in clouds is not the Fuji experience. Arriving at dawn, cycling silently along the north shore as the mountain glows in first light reflected in still water, that is.
If you’re climbing: plan properly, book the hut, carry the right gear, and go slowly. The goraikō – Japan’s sacred sunrise as seen from Japan’s highest point, justifies every step of preparation.
Bookmark this Mt Fuji guide for Indians and share it with anyone planning a Japan trip. For the full Japan trip context, read my main blog here.
If you found this Mt Fuji guide for Indians useful, drop a comment below. Did you see the mountain clearly, and was it the winter morning reflection or the summer climb that won you over?